LAVFilters with BDRIP Playback
2021-08-28 Update: Default configuration changed to hard solution
2021-04-17 Update: Remove xy-VSFilter and migrate to built-in subtitle filter
2021-05-13 Update: Adjust LAV Audio Decoder settings
It seems that madVR is the only way to go when it comes to playback, but naturally there are reasons why I don't use madVR anymore.
As you know, madVR is almost the best solution available, with native 10bit input, color processing, and high quality scaling. But madVR still has the biggest problem of configuration, and decoding efficiency is still a problem on a large number of low to medium performance devices.
Second, for users with relatively low playback requirements, such as display devices in general, want to use the same set of configuration in low-performance devices and so on, configuration madVR is no longer a necessary option. In this case, the use of a relatively basic set of hard resolution configuration, as long as the correct settings, can still cope with the video playback.
Of course, if you still have the need to insist on madVR, please refer to the VCB-S configuration guide here (opens in a new tab).
Required Software
Note: Some "special technology" may be required to download the following content, or to find a domestic alternative source.
PotPlayer
Please go directly to the official website (opens in a new tab) to download the latest x64 version, which at the time of writing is 210729 (1.7.21526).
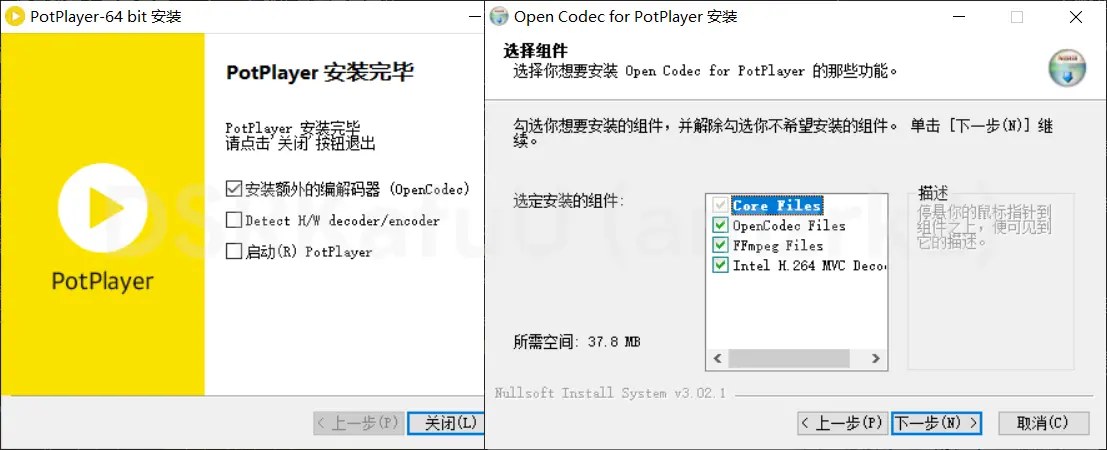
The installation process can be done in the next step, there is nothing to modify, the only thing you need to pay attention to is to remember to check the box to install additional codecs in the last step, as follows.
LAVFilters
Please go directly to GitHub (opens in a new tab) to download the latest version, which at the time of writing is 0.75.1.
Just check LAV Video Decoder (x64), LAV Audio Decoder (x64) and LAV Splitter Source (x64) during installation.
Configure PotPlayer
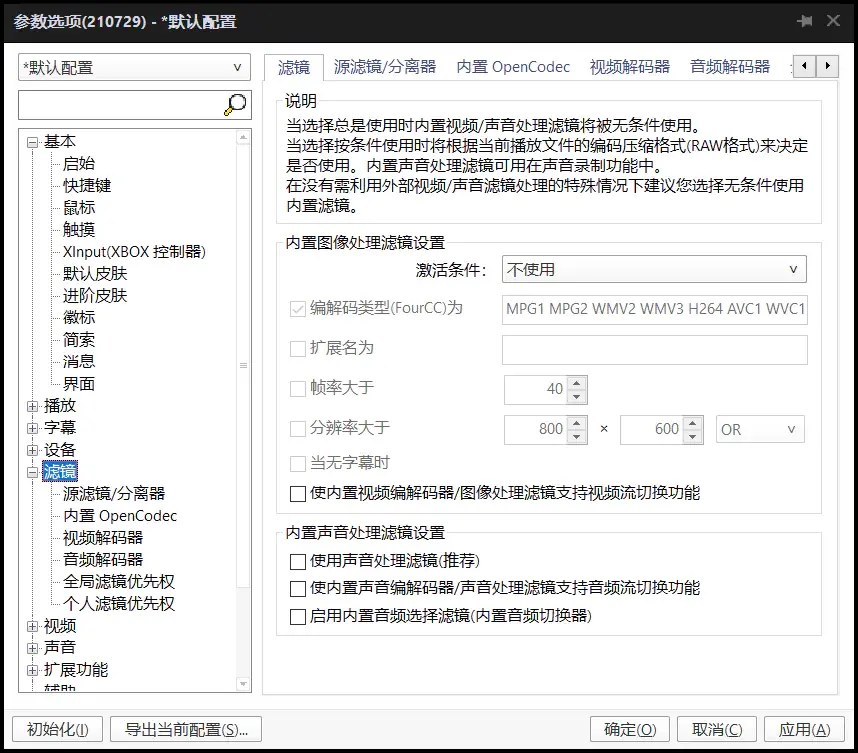
Disable all built-in image filters
Enable LAVFilters
Right-click into options, go to the tab shown on the left below, select "Filter/Decoder Management", click "Add after search" shown on the right below, at this time the filter searched will appear in the left column, just OK it directly.

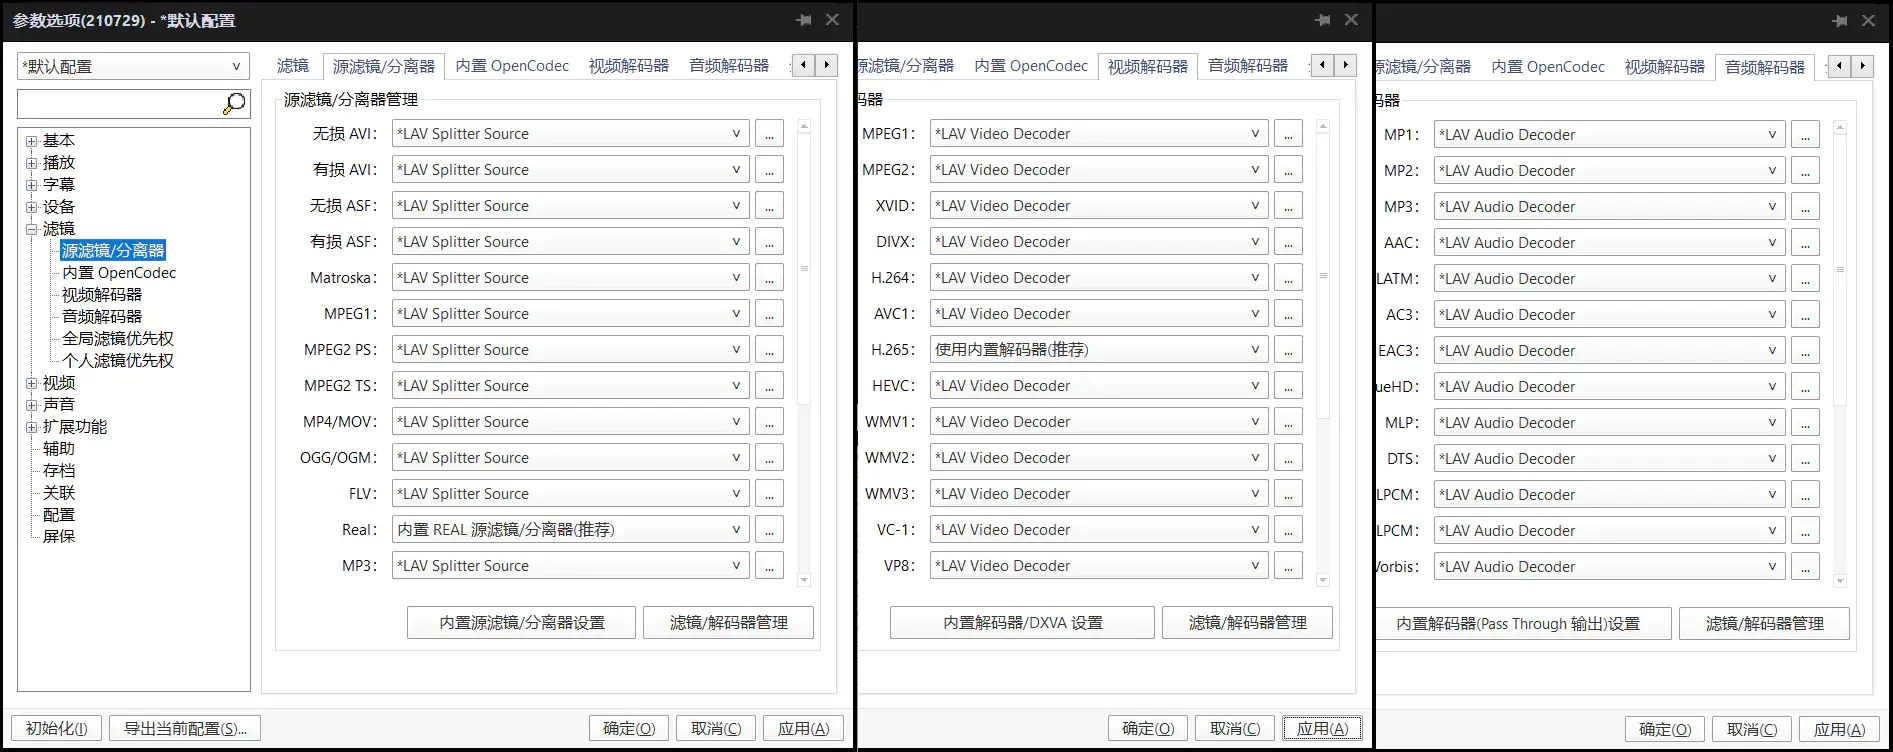
After confirming, set all the "Source Filter/Splitter" as shown below to LAV Splitter Source, all the "Video Decoder" to LAV Video Decoder, and all the audio decoder to LAV Audio Decoder.
Video rendering settings
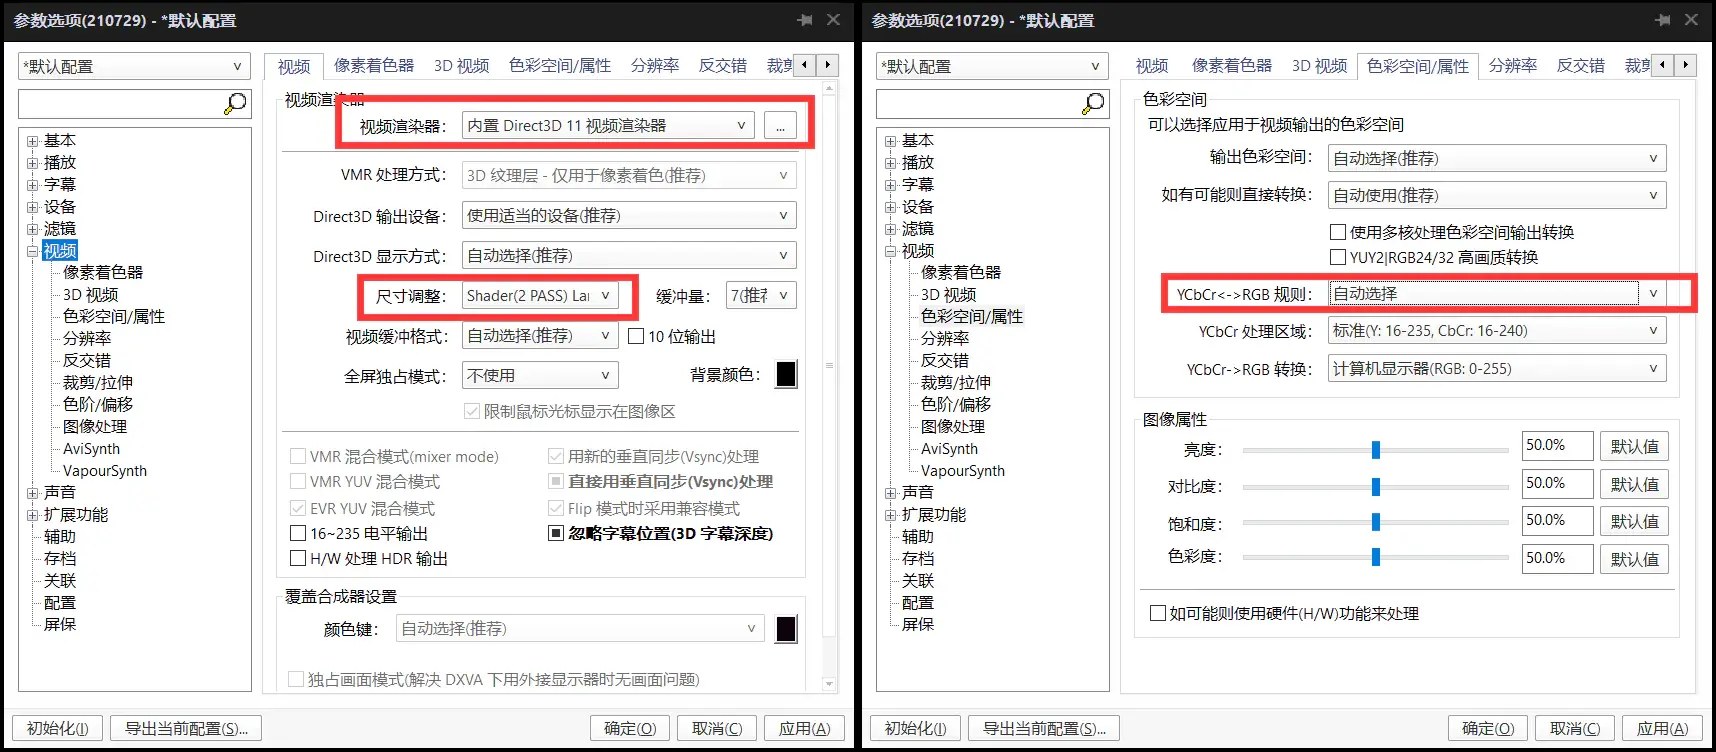
Renderer is set to D3D11, resizing is done with Lanczos 3. "Color System/Attributes" tab, set YCbCr<->RGB rule to be selected automatically.
Audio rendering settings
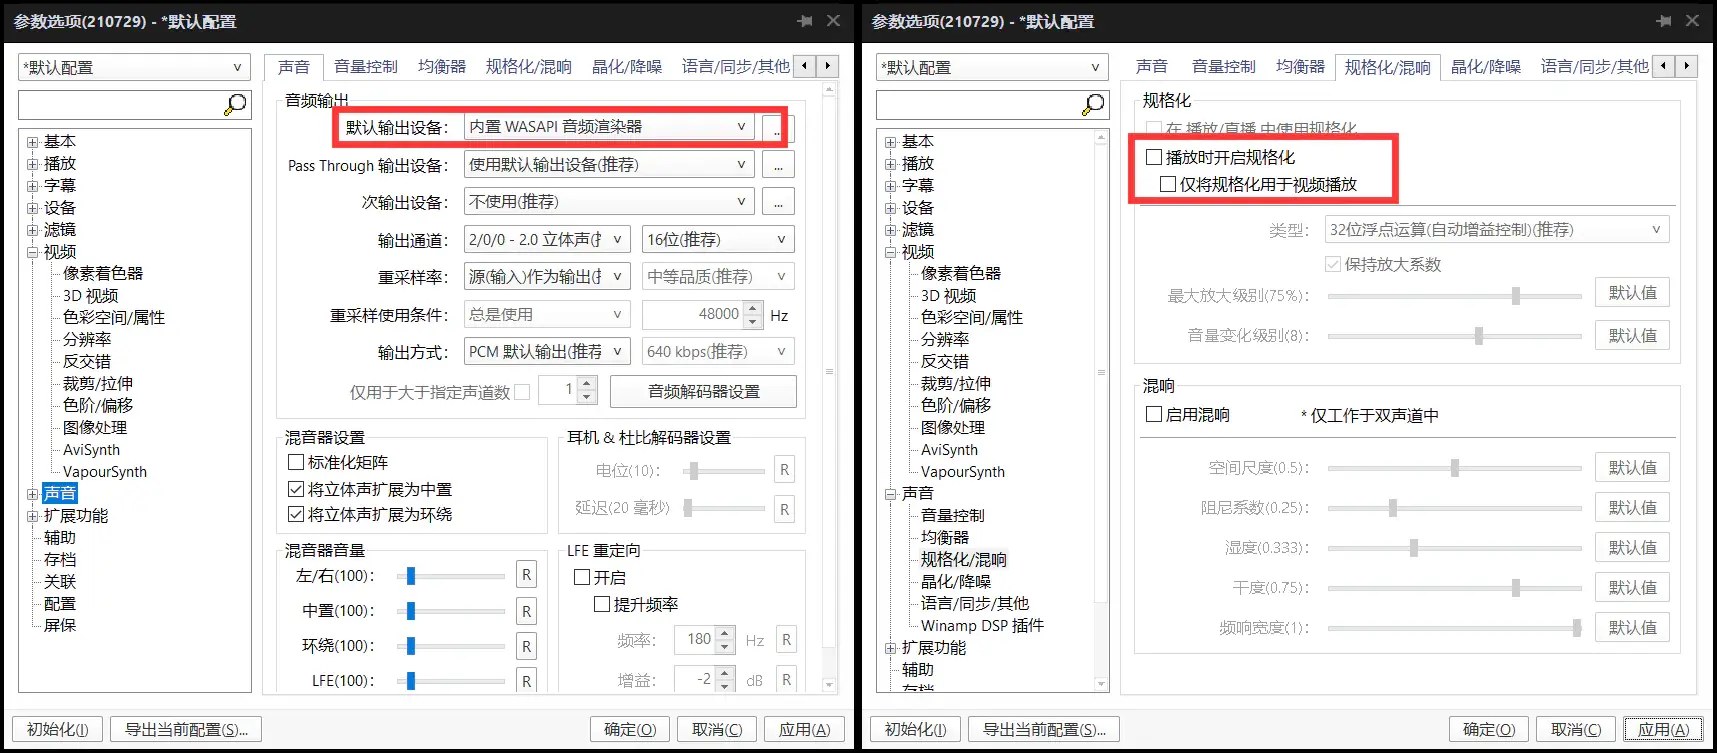
The audio output is changed to WASAPI renderer, turning off the formatting that makes the sound extremely unpleasant.
Test LAVFilters enabled status
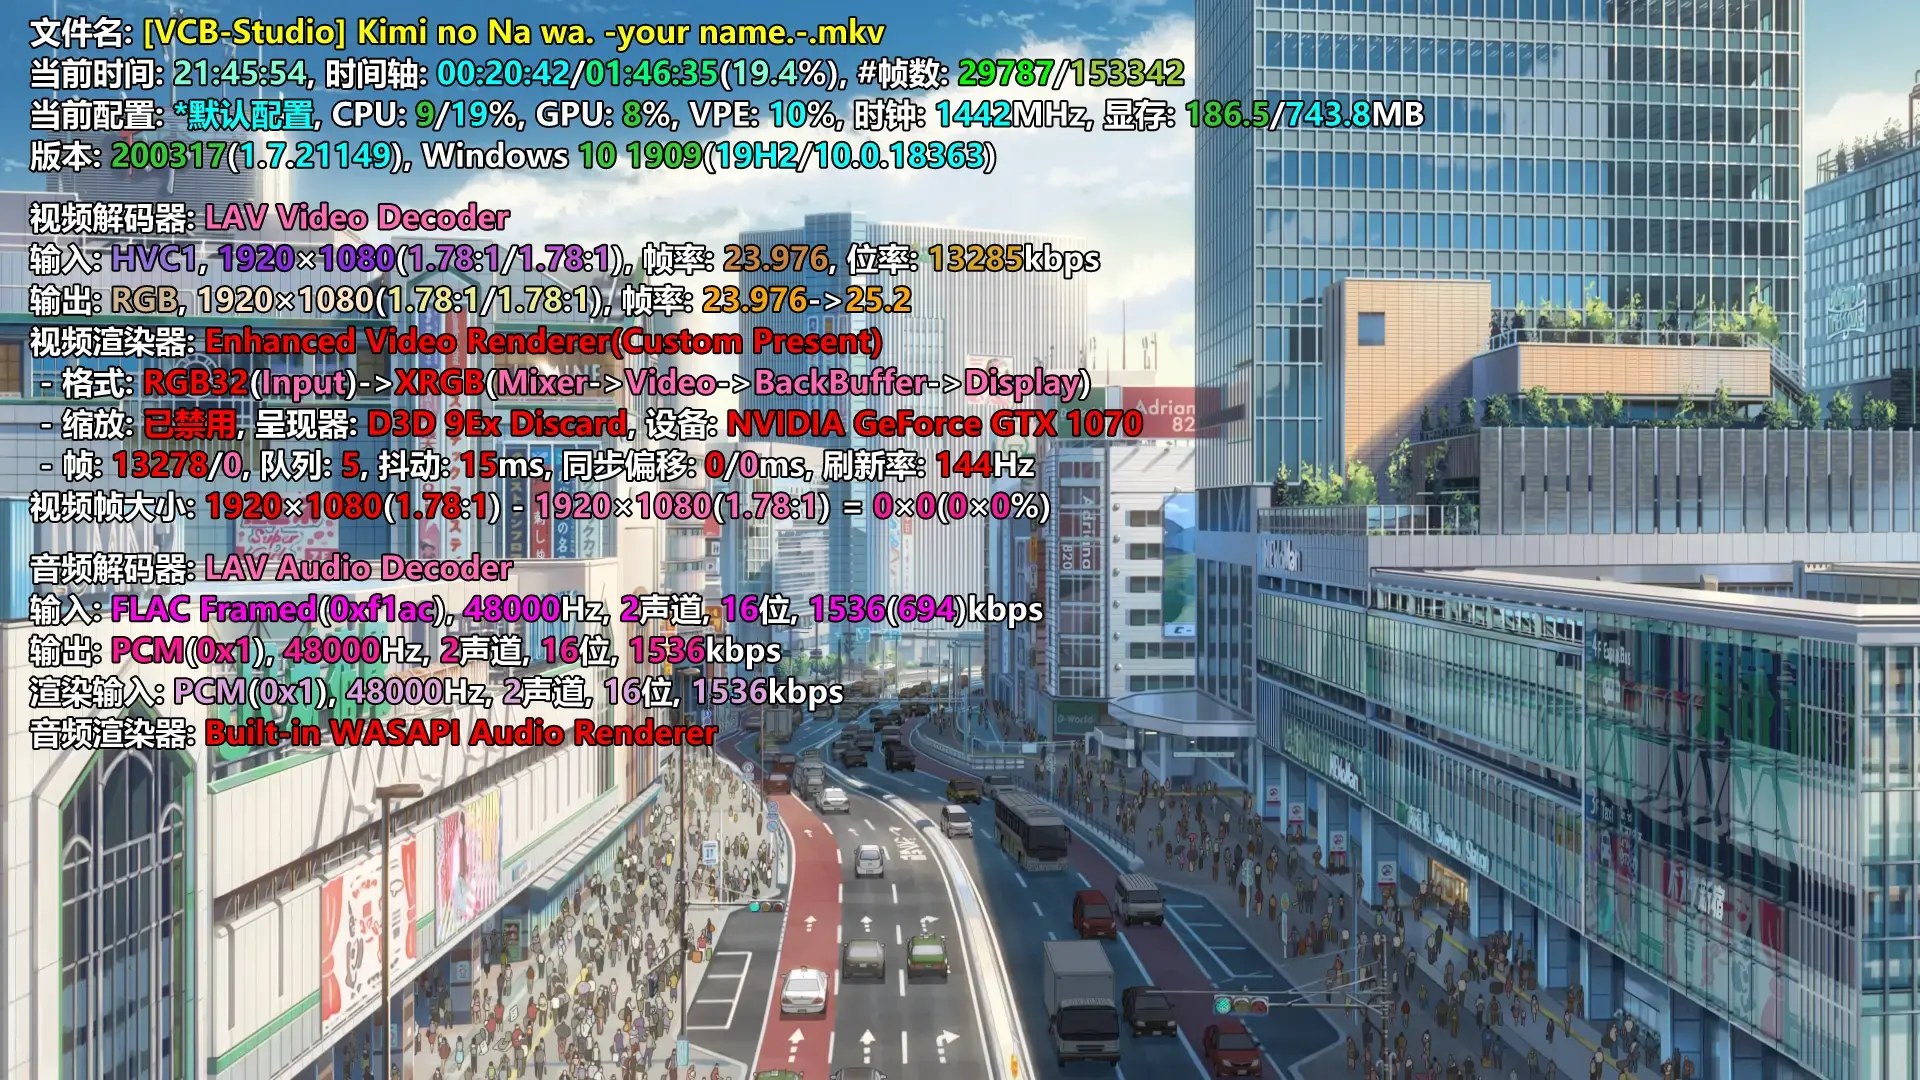
If you open a random video and use the Tab key to open the message overlay, you should see the following picture, then it is enabled properly.
Set LAVFilters
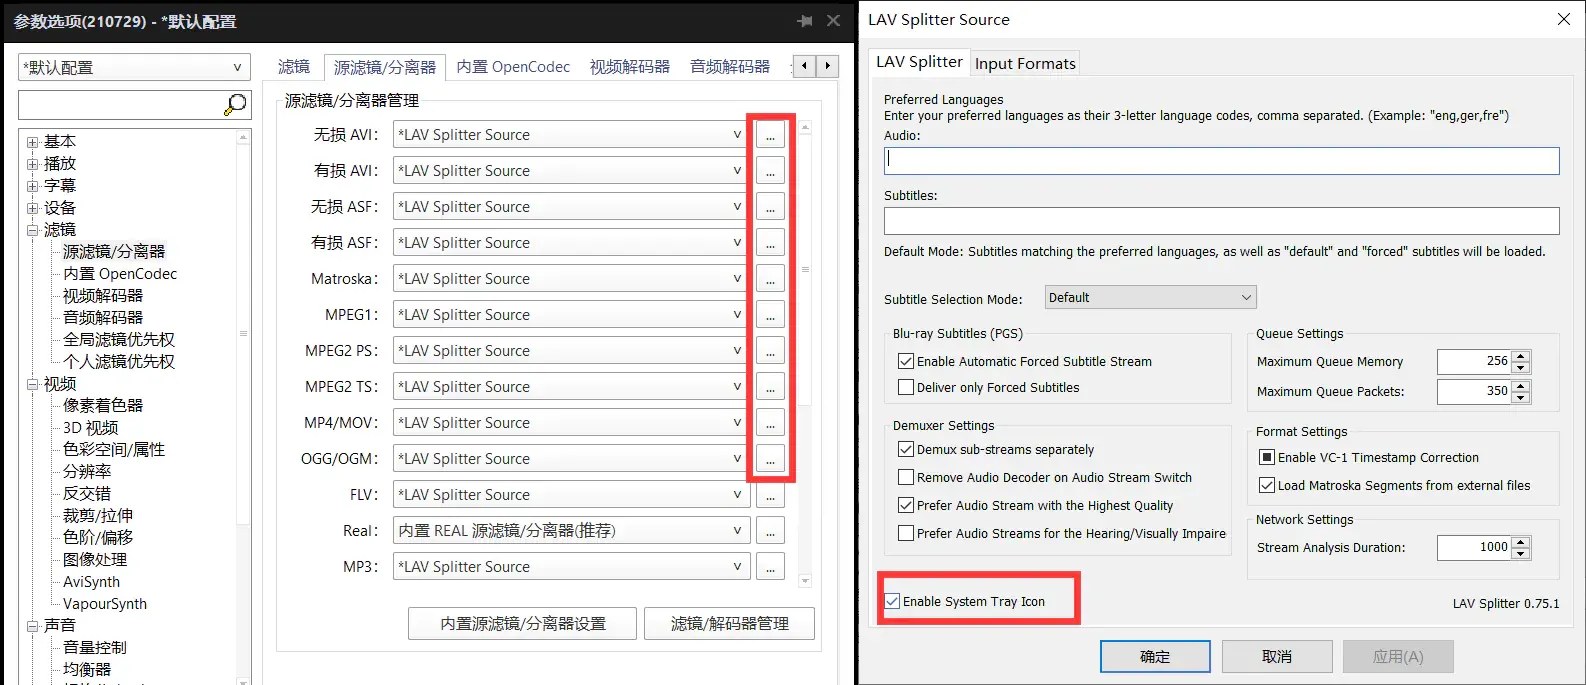
Re-right-click to enter the options, the following tab select any for LAV Splitter Source right "..." button, enter the splitter settings, as shown below to open the system tray icon to facilitate switching audio and video tracks. (Of course, you can also use the player comes with)
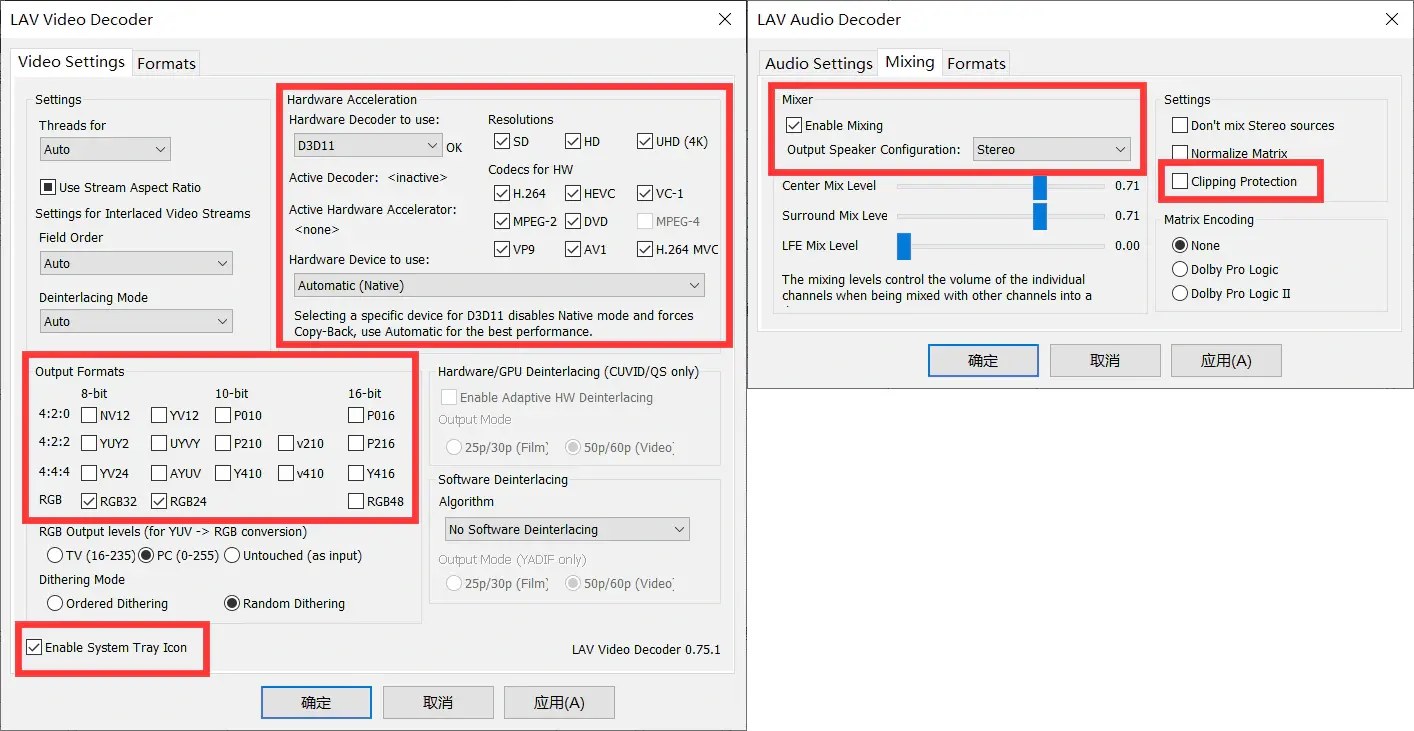
Similarly, enter the LAV Video Decoder setting in the "Video Decoder" tab, as shown below, only RGB24 and RGB32 output formats are retained, and D3D11 is selected and all formats are checked in the upper right corner of the hardware decoding section.
At the same time, enter LAV Audio Decoder settings in "Audio Decoder" tab, turn on Mixing, except for physical multi-channel players; turn off Clipping Protection to avoid affecting audio dynamic range.
At this point, the setup is almost complete and ready to be put into use.
Optimize subtitle rendering
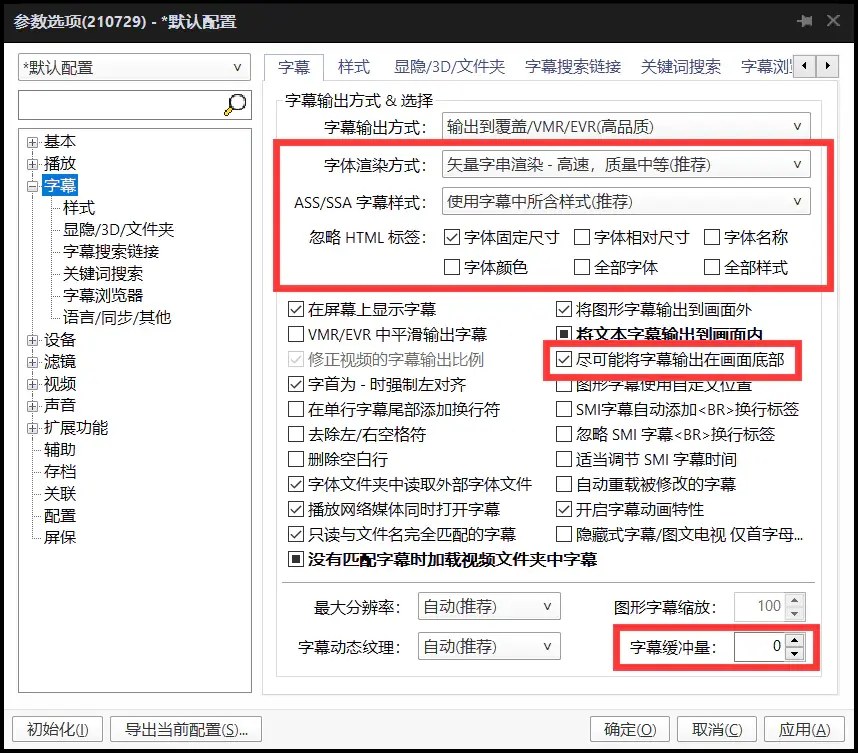
Enter the subtitle settings, set the font rendering method and subtitle style as shown below, check the box to output the subtitles at the bottom of the screen as much as possible, and set the subtitle buffer to 0 as follows.
Old soft solution configuration scheme
In case of problems with hard decoding using D3D11, you can use the old soft decoding scheme.
Set the renderer to EVRCP, resize to Lanczos 3, and set the hard decoding section in the upper right corner to None in the LAV Video Decoder settings mentioned above.
title: LAVFilters with BDRIP Playback date: 2022/05/13 author: Princewen description: ‘Nowadays, the bottleneck in the HD video viewing experience is not in the source, nor in the production, but in the player. When it comes to playback, madVR seems to be the answer, but naturally there are reasons why I don't use madVR anymore’
2021-08-28 Update: Default configuration changed to hard solution
2021-04-17 Update: Remove xy-VSFilter and migrate to built-in subtitle filter
2021-05-13 Update: Adjust LAV Audio Decoder settings
It seems that madVR is the only way to go when it comes to playback, but naturally there are reasons why I don't use madVR anymore.
As you know, madVR is almost the best solution available, with native 10bit input, color processing, and high quality scaling. But madVR still has the biggest problem of configuration, and decoding efficiency is still a problem on a large number of low to medium performance devices.
Second, for users with relatively low playback requirements, such as display devices in general, want to use the same set of configuration in low-performance devices and so on, configuration madVR is no longer a necessary option. In this case, the use of a relatively basic set of hard resolution configuration, as long as the correct settings, can still cope with the video playback.
Of course, if you still have the need to insist on madVR, please refer to the VCB-S configuration guide here (opens in a new tab).
Required Software
Note: Some "special technology" may be required to download the following content, or to find a domestic alternative source.
PotPlayer
Please go directly to the official website (opens in a new tab) to download the latest x64 version, which at the time of writing is 210729 (1.7.21526).
The installation process can be done in the next step, there is nothing to modify, the only thing you need to pay attention to is to remember to check the box to install additional codecs in the last step, as follows.
LAVFilters
Please go directly to GitHub (opens in a new tab) to download the latest version, which at the time of writing is 0.75.1.
Just check LAV Video Decoder (x64), LAV Audio Decoder (x64) and LAV Splitter Source (x64) during installation.
Configure PotPlayer
Disable all built-in image filters
Enable LAVFilters
Right-click into options, go to the tab shown on the left below, select "Filter/Decoder Management", click "Add after search" shown on the right below, at this time the filter searched will appear in the left column, just OK it directly.
After confirming, set all the "Source Filter/Splitter" as shown below to LAV Splitter Source, all the "Video Decoder" to LAV Video Decoder, and all the audio decoder to LAV Audio Decoder.
Video rendering settings
Renderer is set to D3D11, resizing is done with Lanczos 3. "Color System/Attributes" tab, set YCbCr<->RGB rule to be selected automatically.
Audio rendering settings
The audio output is changed to WASAPI renderer, turning off the formatting that makes the sound extremely unpleasant.
Test LAVFilters enabled status
If you open a random video and use the Tab key to open the message overlay, you should see the following picture, then it is enabled properly.
Set LAVFilters
Re-right-click to enter the options, the following tab select any for LAV Splitter Source right "..." button, enter the splitter settings, as shown below to open the system tray icon to facilitate switching audio and video tracks. (Of course, you can also use the player comes with)
Similarly, enter the LAV Video Decoder setting in the "Video Decoder" tab, as shown below, only RGB24 and RGB32 output formats are retained, and D3D11 is selected and all formats are checked in the upper right corner of the hardware decoding section.
At the same time, enter LAV Audio Decoder settings in "Audio Decoder" tab, turn on Mixing, except for physical multi-channel players; turn off Clipping Protection to avoid affecting audio dynamic range.
At this point, the setup is almost complete and ready to be put into use.
Optimize subtitle rendering
Enter the subtitle settings, set the font rendering method and subtitle style as shown below, check the box to output the subtitles at the bottom of the screen as much as possible, and set the subtitle buffer to 0 as follows.
Old soft solution configuration scheme
In case of problems with hard decoding using D3D11, you can use the old soft decoding scheme.
Set the renderer to EVRCP, resize to Lanczos 3, and set the hard decoding section in the upper right corner to None in the LAV Video Decoder settings mentioned above.
